Saturday, January 19, 2013

Sewing Gifts for a Baby


This technically isn't a post for your crazy kids. It's more for crazy mammas who love to sew! Whether your sewing skills are advanced or more at the beginners stage, you'll find these projects pretty easy!

I sewed all of these for our new nephew and had a lot of fun picking out the fabrics and selecting what items to make! I just love how they all turned out!

Here's where I found all of these fun ideas! Most of these sites have really easy to follow instructions with pictures which is really helpful if you're a beginner.

Taggie Blocks:
 http://zaaberry.blogspot.com/2011/02/baby-soft-block-with-ribbon-tutorial.html

Doll: Simplicity Pattern # 2165


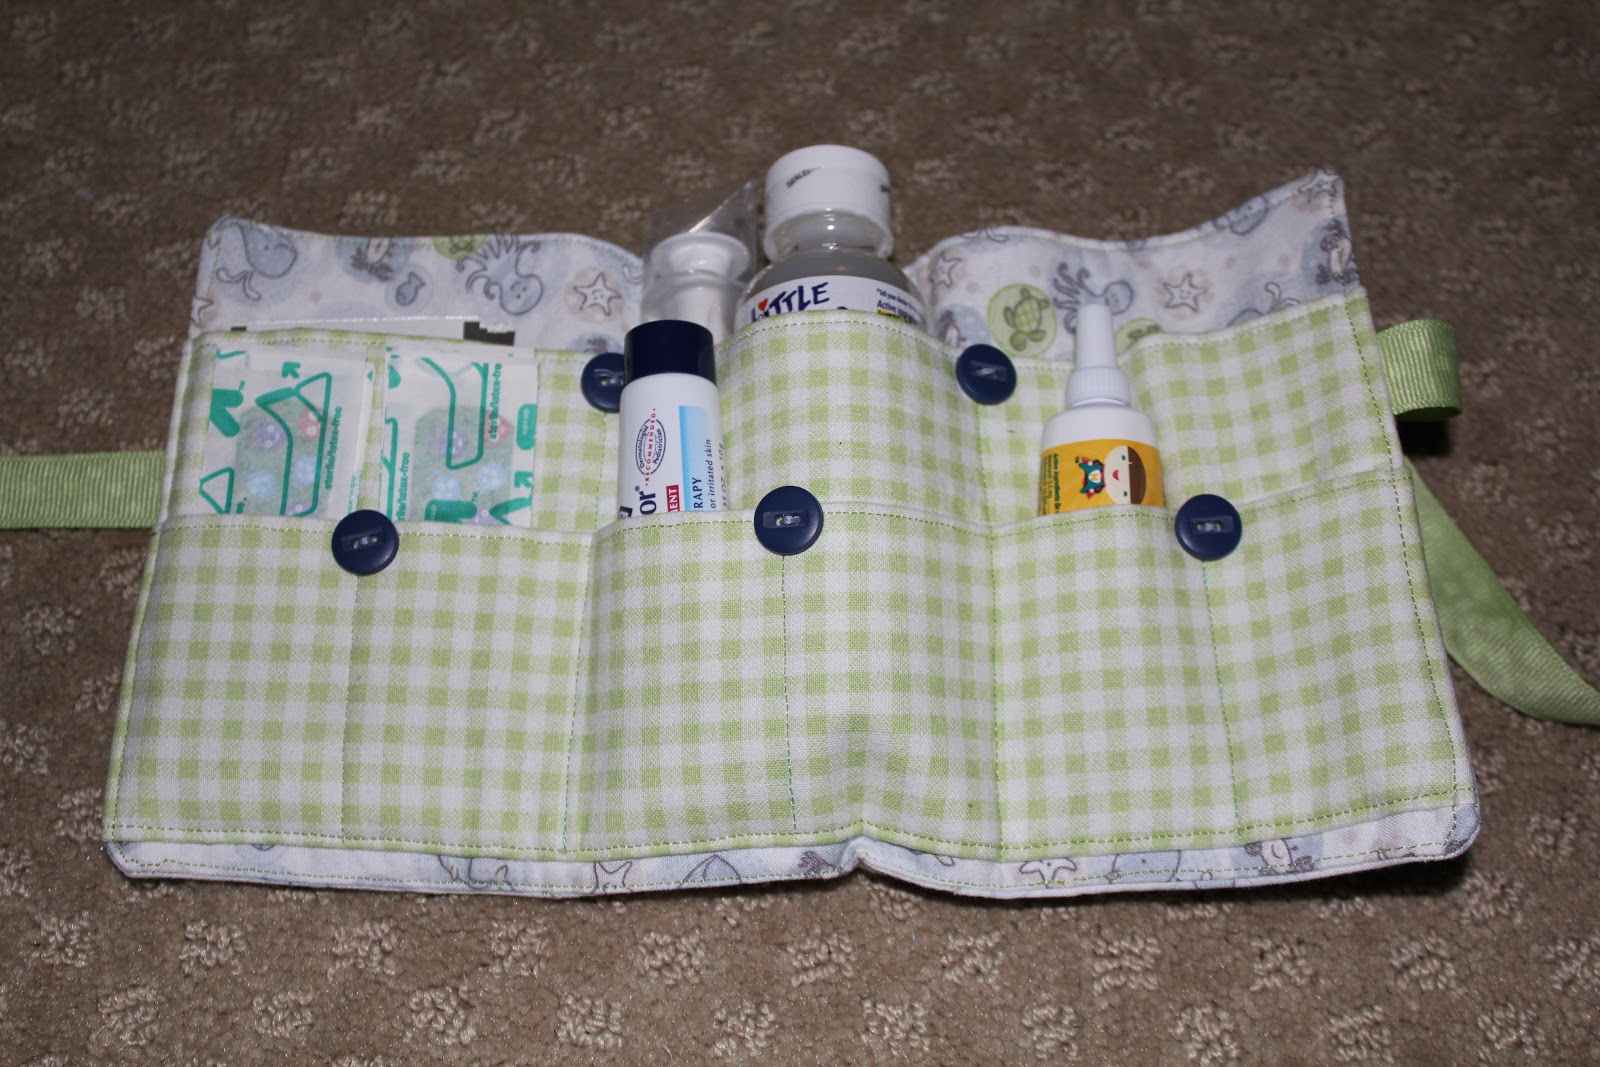
Portable First Aid Kit:
 http://www.positivelysplendid.com/2012/11/portable-first-aid-kit-sewing-tutorial.html

Diaper Pouch and Changing Pad:
http://www.bugglebeehandmade.com/2011/02/diaper-pouch-changing-pad.html


Taggie Blanket:
 http://www.waittilyourfathergetshome.com/2012/10/15/taggie-blanket/

Bips:http://sew-funky.blogspot.com/2008/02/tutorial-make-bib.html


Burp Cloths (the Free Pattern is below, but I used the layered method from the bips tutorial):
http://cloud9fabrics.blogspot.com/2010/12/tutorial-contoured-burp-cloths.html

Large Blanket:
http://www.sew4home.com/projects/bed-linens/stylish-baby-nursery-three-blankets

I hope if you decide to try any of these projects that you will have just as much fun making them for a baby you love as I did!

Advent Wreath and Study

This year I really wanted to try to  do an Advent Study as a family. Unfortunately I failed miserably because the majority of my children were still too young/immature to really be able to pay attention and I wasn't able to spend the couple of minutes needed to prepare for the study each day. Although we only were able to do the study a couple of nights, I still LOVED the idea and will try it again next year!

To start this year, I made my own Advent Wreath. This is pretty easy to do. I started with a foam circle from my local craft store and a set of advent candles. I pressed the candles into the foam to mark where I wanted them to go and then I wrapped two different kinds of ribbon around it. I gently lifted the edges of the ribbon to allow the candle to slip into the foam without revealing any of its green color! I just adore how mine came out and it was a great center piece for our table for the season.

I also really liked the Advent Study I found through Focus on the Family. It's a free download and specifically geared for families with young kids (although I think my 3 and 4 year-olds were a little young because they didn't grasp a lot of the concepts.) I will definitely try their 2013 version next year. You can look at the 2012 version here:
http://www.thrivingfamily.com/advent


Elf on the Shelf

Every year our Elf on the Shelf comes to visit on the first of December. Well he's really only been coming the last two years, but the kids think he's always been apart of our holiday traditions! Our oldest son named him Eddie the first year he arrived and Santa has sent us the same elf each year!

The kids love Eddie and they enjoy looking for him each morning! Our elf is pretty good compared to some of the really naughty elves I've heard of! He tends to pick a favorite spot and stay there for a couple of days (i.e. Mommy and Daddy forget to move him each night!) But it was a fun way to remind the kids to be on their best behavior for Santa!

Each year our kids write their letters to Santa. Our second grader wrote his himself while the other three kids dictated to me what they wanted to say in their letters. Once the letters were written we mailed them off to Santa! (SHHH- I mailed them to my sister!!! Who wrote them back in such a creative way!) The genius here is that I had Eddie bring them back from his visit to Santa and the North Pole one night! That morning was so magical! They were amazed that Santa had returned their letters and even more surprised that Eddie was the one who brought them back.


Friday, January 11, 2013

Christmas Countdown: Growing Santa's Beard

This is such a fun way for your kids to countdown to Christmas. Our very nice wooden advent calendar got broken last year and I replaced with a cute felt advent calendar. Unfortunately with four kids in our home a single advent calendar became something that was played with and fought over more than I would have liked and I needed to find an inexpensive alternative that would make them all happy. This free printable was so cute and just what I was looking for!

I printed one for each kid! Every day they added a cotton ball to Santa's beard. As Santa's beard grew, so did their excitement over Christmas!

You can find the free printable here:
http://playtimewithmommy.blogspot.com/2010/12/christmas-countdowns.html

I do apologize, I forgot to take a picture of Santa's full beard!!

No Mess Finger Paints

When I found this idea on Pinterest I thought it was ingenious! My kids love painting, but I'm not always in the mood to clean up the mess! I thought this would be great for those days when they want to paint but I don't want to deal with a mess.

The original idea came from here:
http://hippiehousewife.blogspot.ca/2012/01/mess-free-finger-painting.html

Unfortunately this was not as big of a hit as I thought it would be. First, I think I didn't add enough paint to the bags and I probably squeezed out too much air. The paint just didn't move around very easily. Second, my four year old REALLY wanted to open the bag and paint the messy way!! I spent most of the activity time hovering over him making sure he didn't open the bag.  This was certainly not the fun activity I had envisioned. I've been meaning to try it a second time, but just haven't gotten around to it.

All that being said, I still think this is an ingenious idea!!


Dinosaur Eggs: Smashable Cotton Balls

I happen to have a little boy who loves all things dinosaur! He fell in love with this activity as soon as I told him that we were going to make dinosaur eggs that we could smash open!

I found the idea here: http://4herreras.blogspot.com/2012/02/smashing-balls-baked-cotton-balls.html

You will need: flour, water, food coloring and something to break them open with!

Mix 1 cup water and 1 cup flour. Add food coloring. We started with 4 colors, but my kids started mixing the colors pretty quickly and created lots of fun new colors.

Place a piece of foil on a cookie sheet and bake at 300 degrees for 45 minutes. Once they are cooled your little ones will have a blast breaking them open! The hardest part was waiting the 45 minutes for them to cook!
 
Before they were baked.
After they were baked.


Lava Lamps

This is so fun! We all remember those really cool lava lamps we drooled over as kids! This is a really fun activity for you to share the awesomeness of lava lamps with a new generation.

Once made, you can keep your lamps for as long as you'd like, but you will eventually need to toss the liquid and start over as it gets yucky after a couple of months.

I found this idea here: http://lilluna.com/diy-lava-lamps/

You will need: a bottle, water, vegetable oil, food coloring and Alka-Seltzer tablets.

1. Fill your bottle a little over half way with the vegetable oil.
2. Fill the rest of the way with water, leaving about an inch empty at the top.
3. Add 10 drops of your desired food coloring.
4. Break  your Alka-Seltzer tablets into quarters, dropping one in at a time, waiting until the bubbles are finished before adding another piece.

My kids LOVED these!!!